记录一下python写爬虫必须要注意的几个点

因为好久没写过爬虫了,这次单位有需求要爬取几TB的资料,在测试过程中遇到一些问题,总结下来,未来写爬虫的时候可以避坑。

问题1:JSON Object Key不存在。规范的情况下,返回的JSON对象数组应该是统一的,即使数据不存在也应该是空字符串或者null或者别的什么,但是这个系统过于老旧,编码也乱七八糟不规范,导致个别数据不存在的时候,压根不返回这个Key。

解决方案:

if 'key' not in item:
    continue

只需要判断一下这个key在不在item里,不在直接跳出此循环。


问题2:保存的文件名/路径有非法字符。在Windows下,创建的文件夹/文件时,文件名不能包含以下字符:

 \ / : * ? " < > |

因此,如果文件名/路径名中有此些字符,需要替换掉,这里提供一个替换方法:

def string_format(str: string, replacement: string=''):
    illegal_words = ['\\', '/', '*', '?' '"', '<', '>', '|']
    for word in illegal_words:
        if word in str:
            str = str.replace(word, replacement)
    return str

参数说明:str 要格式化的字符串,replacement 将非法字符替换成指定内容,不填写则替换空字符串。

Vue3 导出word代码,可导出数据+图片

网上搜到的代码都没办法直接使用,需要修改后才能用,我在这里发一版修改后的完美可用的代码,可以直接拿去用,也给自己留个备份。

我在使用网上搜到的代码的时候遇到一些问题,如果你也遇到了这些问题,那么表示这篇文章可以帮助你。


问题:

1、JSZIP版本太高(V3.x),导致docxtemplater无法使用,以及一些函数大改动。

2、Vue3使用的Vite而不是Webpack,因此 require,Buffer等功能不能使用。


解决方法:

1、手动将JSZIP由3.x改为2.3.0版本,重新npm i,即可解决。

2、Buffer要安装buffer依赖,使用

npm i buffer --save

进行安装,然后直接按如下引用:

import {Buffer} from "buffer";

另外,网络上的代码在加载图片处理依赖时使用的是

var ImageModule = require('docxtemplater-image-module-free');

需要改为

import ImageModule from "docxtemplater-image-module-free";


以上就是主要的问题所在,下面贴上完整代码和一些需要注意的东西。

完整代码

1、开始之前,你需要先安装如下依赖

-- 安装 docxtemplater
npm install docxtemplater pizzip  --save

-- 安装 jszip-utils
npm install jszip-utils --save

-- 安装 jszip
npm install jszip --save

-- 安装 FileSaver
npm install file-saver --save

-- 安装 buffer 用作b64转buffer
npm install buffer --save

-- 安装 docxtemplater-image-module-free 用作图片处理
npm install docxtemplater-image-module-free --save


2、新建一个js文件,我是在/src/utils/下新建的fileExport.js,并粘贴如下内容。

import PizZip from 'jszip';
import docxtemplater from 'docxtemplater';
import JSZipUtils from 'jszip-utils';
import {saveAs} from 'file-saver';
import {Buffer} from "buffer";
import ImageModule from "docxtemplater-image-module-free";


const base64DataURLToArrayBuffer = (dataURL) => {
    const base64Regex = /^data:image\/(png|jpg|svg|svg\+xml);base64,/;
    if (!base64Regex.test(dataURL)) {
        return false;
    }
    const stringBase64 = dataURL.replace(base64Regex, "");
    let binaryString;
    if (typeof window !== "undefined") {
        binaryString = window.atob(stringBase64);
    } else {
        binaryString = new Buffer(stringBase64, "base64").toString("binary");
    }
    const len = binaryString.length;
    const bytes = new Uint8Array(len);
    for (let i = 0; i < len; i++) {
        const ascii = binaryString.charCodeAt(i);
        bytes[i] = ascii;
    }
    return bytes.buffer;
}

/**
 * 导出word,支持图片
 * @param {Object} tempDocxPath 模板文件路径
 * @param {Object} wordData 导出数据
 * @param {Object} fileName 导出文件名
 */
export const exportWord = (tempDocxPath, wordData, fileName, imageSize = {}) => {
    // 读取并获得模板文件的二进制内容
    JSZipUtils.getBinaryContent(tempDocxPath, function (error, content) {
            if (error) {
                throw error;
            }
            let opts = {};
            opts.centered = true; // 图片居中,在word模板中定义方式为{%%image}
            opts.fileType = "docx";
            opts.getImage = function (chartId) {
                return base64DataURLToArrayBuffer(chartId);
            };
            opts.getSize = function (img, tagValue, tagName) {
                // console.log(img);//ArrayBuffer数据
                // console.log(tagValue);//base64数据
                // console.log(tagName);//wordData对象的图像属性名
                // 自定义指定图像大小
                // eslint-disable-next-line no-prototype-builtins
                if (imageSize.hasOwnProperty(tagName)) {
                    return imageSize[tagName];
                } else {
                    return [660, 440];
                }
            }
            let imageModule = new ImageModule(opts);
            // 创建一个PizZip实例,内容为模板的内容
            const zip = new PizZip(content);
            // 创建并加载docxtemplater实例对象
            const doc = new docxtemplater();
            doc.attachModule(imageModule);
            doc.loadZip(zip);

            doc.setData(wordData);

            try {
                // 用模板变量的值替换所有模板变量
                doc.render();
            } catch (error) {
                // 抛出异常
                const e = {
                    message: error.message,
                    name: error.name,
                    stack: error.stack,
                    properties: error.properties
                };
                console.log(
                    JSON.stringify({
                        error: e
                    })
                );
                throw error;
            }
            console.log('11');
            // 生成一个代表docxtemplater对象的zip文件(不是一个真实的文件,而是在内存中的表示)
            const out = doc.getZip().generate({
                type: 'blob',
                mimeType: 'application/vnd.openxmlformats-officedocument.wordprocessingml.document'
            });
            // 将目标文件对象保存为目标类型的文件,并命名
            saveAs(out, fileName);
        }
    );
};


3、参数说明

  • tempDocxPath 是模板文件绝对路径
  • wordData 模板数据
  • fileName 要保存的文件名
  • imageSize 图片大小,接受一个int对象,格式是{ width, height },单位是px,例如{ 400, 300 }

如需导出图片,则需要将图片转为base64后写入wordData对象内。

echarts转base64的方法是

echarts.getInstanceByDom(document.getElementById('echarts')).getDataURL({
    type: 'png',
    backgroundColor: '#fff',
    pixelRatio: 1,
})


4、模板变量

模板内变量要和wordData里的变量名一致。普通字段:{字段名},图片字段:{%字段名}


以上

ThinkPHP6 多应用模式调用其他控制器时需要填写$app参数,报错Required parameter ‘$app’ missing

如图所示,在多应用情况下,我调用User() 控制器,提示需要填写$app参数,

因为我所有的控制器都是 extends BaseController 的,所以查看BaseController的源码,发现如下

/**
 * 构造方法
 * @access public
 * @param  App  $app  应用对象
 */
public function __construct(App $app)
{
    $this->app     = $app;
    $this->request = $this->app->request;

    // 控制器初始化
    $this->initialize();
}

调用时需要传入一个App对象。

在网上和文档里查了半天都没结果,自己猜出解决方案。

传入参数如下:

(new App())->initialize()

完整的也就是

$user = new User((new App())->initialize());

你学废了吗?


By the way,TP6的文档写的乱七八糟,我真特么是服了,遇到问题看文档屁用没有。


青骄第二课堂全国青少年禁毒知识一键满分脚本

[admonition]转载请保留出处,严禁倒卖,倒卖者亲🐴biss[/admonition]

前言

去年发过的禁毒知识竞赛的满分脚本,今年还能用。重新发布一下。

按照下面使用方法使用可一键满分,不用进去答题。

有问题请进QQ群交流:1153448795

效果图:

使用方法

1、登录https://www.2-class.com/competition

2、按F12打开开发者工具,选择应用(Application) -> 左侧Cookie加号点开 -> 选择https://www.2-class.com/

3、复制右侧的asw_tcsid的值

4、切换回控制台(Console) -> 在下方输入框里输入命令:window.__DATA__.reqtoken 并回车

5、复制双引号内的内容

6、运行脚本,依次输入以上3个数据。


代码

# -*- coding: utf-8 -*-

import requests
import json
import time
import random


# 获取reqtoken的命令: window.__DATA__.reqtoken

# cookie = 'acw_tc=76b20f6616659797159527027e3350e04399c20a051cfaf70874ad516c6900; sid=e993abc8-00ee-4173-9c36-abd5d059babd;'
# reqtoken = '9f83d24e-7e12-4c47-a45b-b677694fa7a3'


def yi_jian_man_fen(cookie, reqtoken):
    url = 'https://www.2-class.com/api/quiz/commit'
    headers = {
        'Cookie': cookie,
        'Content-Type': 'application/json',
        'User-Agent': 'Mozilla/5.0 (Macintosh; U; Intel Mac OS X 10_6_8; en-us) AppleWebKit/534.50 (KHTML, like Gecko) Version/5.1 Safari/534.50'
    }
    time = random.randint(100, 350)
    data = {
        "list": [
            {
                "questionId": 2986,
                "questionContent": "B"
            },
            {
                "questionId": 2989,
                "questionContent": "C"
            },
            {
                "questionId": 2990,
                "questionContent": "D"
            },
            {
                "questionId": 2959,
                "questionContent": "C"
            },
            {
                "questionId": 2928,
                "questionContent": "C"
            },
            {
                "questionId": 2960,
                "questionContent": "A"
            },
            {
                "questionId": 2961,
                "questionContent": "C"
            },
            {
                "questionId": 2897,
                "questionContent": "B"
            },
            {
                "questionId": 2930,
                "questionContent": "D"
            },
            {
                "questionId": 2898,
                "questionContent": "B"
            },
            {
                "questionId": 2963,
                "questionContent": "A"
            },
            {
                "questionId": 2932,
                "questionContent": "D"
            },
            {
                "questionId": 2901,
                "questionContent": "A"
            },
            {
                "questionId": 2966,
                "questionContent": "D"
            },
            {
                "questionId": 2934,
                "questionContent": "C"
            },
            {
                "questionId": 2904,
                "questionContent": "D"
            },
            {
                "questionId": 2907,
                "questionContent": "D"
            },
            {
                "questionId": 2972,
                "questionContent": "C"
            },
            {
                "questionId": 2973,
                "questionContent": "A"
            },
            {
                "questionId": 2912,
                "questionContent": "B"
            }
        ],
        "time": time,
        "reqtoken": reqtoken
    }

    result = requests.post(url=url, data=json.dumps(data), headers=headers, verify=False)
    print(result.text)


if __name__ == '__main__':
    acw_tc = input('请输入acw_tc:')
    sid = input('请输入sid:')
    reqtoken = input('请输入token:')
    cookie = f'acw_tc={acw_tc}; sid={sid};'
    yi_jian_man_fen(cookie, reqtoken)


其他

不欢迎任何商业行为。

司马52pojie,10年多了,封我账号,祝52pojie早日倒闭。

Vue3 错误处理机制onErrorCaptured使用方法

大家好,我在做JSON转XML时出现,如果字符串格式是XML,但是却强制进行JSON -> XML操作,控制台会报错Syntex Error,这个错误是人为导致的,并不是代码有问题,因此我需要捕获这个错误并处理。

尝试过使用try catch来捕获,发现根本没用。

经过查阅文档,发现可以使用生命周期钩子onErrorCaptured来处理

下面是我的代码,各位在使用时可以借鉴。

onErrorCaptured((err) => {
      // 判断是错误还是异常
      if (err.toString().indexOf('SyntaxError') !== -1) {
        ElNotification({
          title: '程序出错',
          message: err.message,
          type: 'error',
        })
        return false
      }
    })


err是返回的错误对象,你要查找特定的错误就得把他转字符串,你可以在控制台看到完整的错误信息(红色的),err.message只包含内容,不包含开头的错误或警告类型。

祝各位程序永无BUG

超简单使用elementUI的表单验证,看不懂官方文档的看这里

复杂的官方文档

大家好,编写elementUI时,看到新的element-plus的表单验证部分写的如此的复杂,我下面复制官方文档的表单验证部分的代码。

<template>
  <el-form
    ref="ruleFormRef"
    :model="ruleForm"
    :rules="rules"
    label-width="120px"
    class="demo-ruleForm"
    :size="formSize"
  >
    <el-form-item label="Activity name" prop="name">
      <el-input v-model="ruleForm.name" />
    </el-form-item>
    <el-form-item label="Activity zone" prop="region">
      <el-select v-model="ruleForm.region" placeholder="Activity zone">
        <el-option label="Zone one" value="shanghai" />
        <el-option label="Zone two" value="beijing" />
      </el-select>
    </el-form-item>
    <el-form-item label="Activity time" required>
      <el-col :span="11">
        <el-form-item prop="date1">
          <el-date-picker
            v-model="ruleForm.date1"
            type="date"
            placeholder="Pick a date"
            style="width: 100%"
          />
        </el-form-item>
      </el-col>
      <el-col class="text-center" :span="2">
        <span class="text-gray-500">-</span>
      </el-col>
      <el-col :span="11">
        <el-form-item prop="date2">
          <el-time-picker
            v-model="ruleForm.date2"
            placeholder="Pick a time"
            style="width: 100%"
          />
        </el-form-item>
      </el-col>
    </el-form-item>
    <el-form-item label="Instant delivery" prop="delivery">
      <el-switch v-model="ruleForm.delivery" />
    </el-form-item>
    <el-form-item label="Activity type" prop="type">
      <el-checkbox-group v-model="ruleForm.type">
        <el-checkbox label="Online activities" name="type" />
        <el-checkbox label="Promotion activities" name="type" />
        <el-checkbox label="Offline activities" name="type" />
        <el-checkbox label="Simple brand exposure" name="type" />
      </el-checkbox-group>
    </el-form-item>
    <el-form-item label="Resources" prop="resource">
      <el-radio-group v-model="ruleForm.resource">
        <el-radio label="Sponsorship" />
        <el-radio label="Venue" />
      </el-radio-group>
    </el-form-item>
    <el-form-item label="Activity form" prop="desc">
      <el-input v-model="ruleForm.desc" type="textarea" />
    </el-form-item>
    <el-form-item>
      <el-button type="primary" @click="submitForm(ruleFormRef)"
        >Create</el-button
      >
      <el-button @click="resetForm(ruleFormRef)">Reset</el-button>
    </el-form-item>
  </el-form>
</template>

<script lang="ts" setup>
import { reactive, ref } from 'vue'
import type { FormInstance, FormRules } from 'element-plus'

const formSize = ref('default')
const ruleFormRef = ref<FormInstance>()
const ruleForm = reactive({
  name: 'Hello',
  region: '',
  date1: '',
  date2: '',
  delivery: false,
  type: [],
  resource: '',
  desc: '',
})

const rules = reactive<FormRules>({
  name: [
    { required: true, message: 'Please input Activity name', trigger: 'blur' },
    { min: 3, max: 5, message: 'Length should be 3 to 5', trigger: 'blur' },
  ],
  region: [
    {
      required: true,
      message: 'Please select Activity zone',
      trigger: 'change',
    },
  ],
  date1: [
    {
      type: 'date',
      required: true,
      message: 'Please pick a date',
      trigger: 'change',
    },
  ],
  date2: [
    {
      type: 'date',
      required: true,
      message: 'Please pick a time',
      trigger: 'change',
    },
  ],
  type: [
    {
      type: 'array',
      required: true,
      message: 'Please select at least one activity type',
      trigger: 'change',
    },
  ],
  resource: [
    {
      required: true,
      message: 'Please select activity resource',
      trigger: 'change',
    },
  ],
  desc: [
    { required: true, message: 'Please input activity form', trigger: 'blur' },
  ],
})

const submitForm = async (formEl: FormInstance | undefined) => {
  if (!formEl) return
  await formEl.validate((valid, fields) => {
    if (valid) {
      console.log('submit!')
    } else {
      console.log('error submit!', fields)
    }
  })
}

const resetForm = (formEl: FormInstance | undefined) => {
  if (!formEl) return
  formEl.resetFields()
}
</script>

一个简单的表单验证写的这么啰嗦,我就想校验一下登录账号和密码,需要这么麻烦吗?

其实只需要FormInstance就可以实现了。

超简单的写法

对于简单的表单验证,完全不需要上面那么啰嗦。

其实验证是很简单的,只需要写一个验证的数组(rules),并赋值给el-form组件的rule参数即可,如下

<el-form ref="formRef" :model="loginForm" :rules="rules" label-position="top"></el-form>

rules长这样

const rules = ref({
      phone: [
        {required: true, message: '必须输入手机号码', trigger: 'blur'},
        {pattern: /^1[3456789]\d{9}$/, message: '手机号码格式不正确', trigger: 'blur'},
      ],
      password: [
        {required: true, message: '必须输入密码', trigger: 'blur'},
        {min: 6, max: 20, message: '密码长度在 6 到 20 个字符', trigger: 'blur'},
      ]
    })

那你可能会问了,ref是干啥用的啊?

告诉你,ref的目的是为了在提交或者什么操作的时候,手动验证表单,如下。

比如我们有个登录按钮,和登录的方法onLogin()

<el-button type="primary" @click="onLogin(formRef)">登录</el-button>
const onLogin = (form) => {
      form.validate((valid, fields) => {
        if (valid) {
          console.log('登录成功')
        } else {
          console.log('error submit!', fields)
        }
      })
    }

相信小伙伴们已经看明白什么意思了。

简单来说,就是在登录方法里传参传这个ref进去,然后这个ref有validate()方法,通过这个方法就校验了。上面的if else是固定写法。

那么ref这个值是哪来的呢?其实是开头说的FormInstance定义出来的,定义如下:

// 引用
import {FormInstance} from "element-plus"

// 这个是写在setup()里的!!
const formRef = ref<FormInstance>('')


怎么样,是不是比官方那啰里啰嗦一大串舒服多了?

(转载)一劳永逸解决Vue sass-loader node-sass node的安装问题

node-sass代码库地址:https://github.com/sass/node-sass

吐槽

我已经被sass这个sb玩意折磨了无数次了,直接npm i sass-loader 就会报错,之前碰巧降版本解决了问题,但是这几天发现降版本也不管用了,百度直接搜错误信息甚至都找不到一个有用的答案。

查了N多资料无果之后我换了种方法,因为要实现sass需要同时有 sass-loader  node-sass   而node-sass一看就和node有关系,我以此为切入点搜索,终于让我找到一个大佬总结的文章。

为了以后不再被这sb玩意折磨,我决定转载一下这个文章。如果能帮到各位,请去给原作者点赞!

见过的错误

1、安装sass-loader后报 TypeError: this.getOptions is not a function

2、安装sass-loader 低版本后报 Syntax Error: Error: PostCSS received undefined instead of CSS string

3、安装node-sass时报 Install fail! RunScriptError: post install error, please remove node_modules before retry!

也许还有其他错误,但是这几个我几乎每次都能遇到。

万能无错版本

大佬总结了一套万能无错版本,但是经过我测试,以下版本对应是最完美的!

重要提醒:一定要先看node版本是不是符合要求,不符合的用下面的方法修改,不然装不上。版本一定得对应!

node 12.x
sass-loader 7.3.1
node-sass 4.14.1

node 16.x
sass-loader 10.0.1
node-sass 6.0.1

node版本对应的node-sass

NodeJS Supported node-sass version Node Module
Node 17 7.0+ 102
Node 16 6.0+ 93
Node 15 5.0+, <7.0 88
Node 14 4.14+ 83
Node 13 4.13+, <5.0 79
Node 12 4.12+, <8.0 72
Node 11 4.10+, <5.0 67
Node 10 4.9+, <6.0 64
Node 8 4.5.3+, <5.0 57
Node <8 <5.0 <57

下面是node-sass和sass-loader推荐对应版本

sass-loader@^4.1.1,node-sass@^4.3.0
sass-loader@^7.0.3,node-sass@^4.7.2
sass-loader@^7.3.1,node-sass@^4.7.2
sass-loader@^7.3.1,node-sass@^4.14.1

安装node-sass和sass-loader的方法

// 以下管理器任选一种,推荐cnpm
npm i node-sass@^4.14.1
cnpm i node-sass@^4.14.1
yarn add node-sass@^4.14.1

npm i sass-loader@^7.3.1
cnpm i sass-loader@^7.3.1
yarn add sass-loader@^7.3.1

查看 node 版本的方法

node -v

修改 node 版本的方法

// 首先安装node版本管理器n
sudo npm install n -g

// 自定义版本号安装
sudo n 版本号  //例如:sudo n 10.16.0 ; 本文推荐 sudo n 12

// 安装稳定版
sudo n stable

// 安装最新版
sudo n latest

简单的CSS3贪吃豆动画

无聊透顶,看到B站有个这动画感觉挺有趣的,自己实现了一下。

没有动力码字了,直接上代码吧,就几句话你们自己粘贴一下马上就能用。

HTML:

<div>
  <div class="dot-up">
  </div>
  <div class="dot-down">
  </div>
</div>

CSS:

.dot-up {
  background-color: #800080;
  width: 100px;
  height: 50px;
  border-radius: 50px 50px 0 0;
  animation: eat-haha-up 1s infinite;
  transform-origin: center bottom;
}

.dot-down {
  background-color: #800080;
  width: 100px;
  height: 50px;
  border-radius: 0 0 50px 50px;
  animation: eat-haha-down 1s infinite;
  transform-origin: center top;
}

@keyframes eat-haha-up {
  0% {
    transform: rotate(0)
  }

  25% {
    transform: rotate(-45deg)
  }

  50% {
    transform: rotate(0)
  }

  75% {
    transform: rotate(-45deg)
  }

  to {
    transform: rotate(0)
  }
}

@keyframes eat-haha-down {
  0% {
    transform: rotate(0)
  }

  25% {
    transform: rotate(45deg)
  }

  50% {
    transform: rotate(0)
  }

  75% {
    transform: rotate(45deg)
  }

  to {
    transform: rotate(0)
  }
}

效果:


[python] openpyxl 的一些使用上的小问题记录一下

1、获取sheet直接使用数组形式:

sheet = work_book['Sheet0']

2、取单元格值是value

some_value = sheet.cell(row=1, column=1).value

3、遍历行 列的方法

# 这个的索引是从1开始的,最后max+1是为了最后一行可以匹配到

# 遍历行
for row in range(begin_row_index, sheet.max_row + 1):
 # some code
 break

# 遍历列

# 遍历行
for column in range(begin_column_index, sheet.max_column + 1):
 # some code
 break

4、填充,字体等设置方法

# 设置颜色 具体函数内容请阅读文档
sheet.cell(row=1, column=1).font = Font(color='FF0000')

# 设置填充
sheet.cell(row=1, column=1).fill = PatternFill(patternType='solid', fgColor='FF0000')


河南宗教知识竞赛加密算法分析

开头

我的博客因宗教插件而火,故在1400多人的强烈要求下今年还是更新了。这个东西确实没法说,要求满分不给题库,40分钟搜个锤子呢,这不是找着让大学生都去找代刷呢,能学了吗,达的到目的吗?

我的群一直讲究技术交流为主,资源分享为辅,和谐交流环境,禁商禁推广发现就踢。所以这次也算造福一下同学们了。

起因

2021年11月23日早上群友发现插件全部失效了,上班前看了一眼,发现题目结构和开始时间都被加密了,导致老的数据全部失效,因此今天晚上下班回来简单分析了一下,发现并不是那么难,下面把分析过程写在这篇文章里,以作为技术交流。

分析

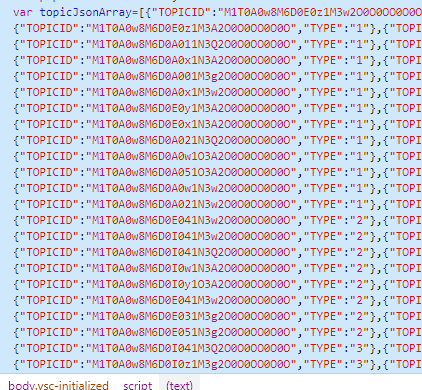
首先看一下加密后的代码结构:

可观察到大部分的重复以及最后面那显眼的0000000

起初我并没看出这是什么算法,但因为知道之前没加密的时候是一串数字,如1000055这类的,可以看出编码算法应该是个通用算法。

首先想到的就是Base64,经过测试,发现和图中数据不一致,如下面所示

原文:1000143

Base64:MTAwMDE0Mw==

图中加密的:M1T0A0w8M6D0E001M3w2O0O0O0O0

可观察出有很多相似的地方。

尝试对比后,发现如下规律(图中是另一个用户下测试的)

发现被插入的数字是 1004901214 在网页源码中查找此数字,发现正是memberusercode的值

也就是说算法其实很简单,就是把原先的数据经过Base64编码,然后每隔一位将memberusercode的一位数插入进去,最后把 == 替换成那一堆O0,如果没有 == 则直接在后面加上 O0

至此,分析完毕。

算法实现

我用js来实现这个算法,非常简单,拿来直接可以用。以下是代码实现:

function encrypt(content) {
    let code = memberusercode;
    content = window.btoa(content);
    for (let i = 0; i < 10; i++) {
        content = content.slice(0, 2 * i + 1) + code.slice(i, i + 1) + content.slice(2 * i + 1);
    }
    if (content.indexOf('==') == -1) {
        content += 'O0O0OO0O0O';
    } else {
        content = content.replace('==', 'O0O0OO0O0O');
    }
    return content;
}

就不再写注释了,各位同学可以度读一下代码看看是如何实现的,非常简单。

需要注意的是,我们需要在中间插入,要考虑到插入后的文本长度,如下所示

原文:A B C D

1次插入:A X B C D

2次插入:A X B X C D

3次插入:A X B X C X D

……

所以我们插入的索引位置是1 3 5 7 9 ……

因此,for循环内的slice的长度使用的是等差数列公式2i + 1

帮一下官方

我非常明白官方想防作弊的决心,但是说句实话,这样的算法难不倒广大高材生,我并不是第一个解出来的。我愿意在此祝官方一臂之力!

下面我给官方提供一套我在用的自定义算法,非常好用,我用它来生成用户TOKEN。

密钥不泄露几乎不存在被反解密的情况。语言是PHP的。

function encryption($string, $operation)
{
    $key = md5(config('encryption_key')); // 这是密钥,可以写在数据库或配置文件内
    $key_length = strlen($key);
    $string = str_replace('_', '/', $string);
    $string = str_replace("-", '\\', $string);
    $string = str_replace("*", '+', $string);
    $string = $operation == 'D' ? base64_decode($string) : substr(md5($string . $key), 0, 8) . $string;
    $string_length = strlen($string);
    $rndkey = $box = array();
    $result = '';
    for ($i = 0; $i <= 255; $i++) {
        $rndkey[$i] = ord($key[$i % $key_length]);
        $box[$i] = $i;
    }
    for ($j = $i = 0; $i < 256; $i++) {
        $j = ($j + $box[$i] + $rndkey[$i]) % 256;
        $tmp = $box[$i];
        $box[$i] = $box[$j];
        $box[$j] = $tmp;
    }
    for ($a = $j = $i = 0; $i < $string_length; $i++) {
        $a = ($a + 1) % 256;
        $j = ($j + $box[$a]) % 256;
        $tmp = $box[$a];
        $box[$a] = $box[$j];
        $box[$j] = $tmp;
        $result .= chr(ord($string[$i]) ^ ($box[($box[$a] + $box[$j]) % 256]));
    }
    if ($operation == 'D') {
        if (substr($result, 0, 8) == substr(md5(substr($result, 8) . $key), 0, 8)) {
            $result = substr($result, 8);
            return $result;
        } else {
            return '';
        }
    } else {
        $result = str_replace('=', '', base64_encode($result));
        $result = str_replace('/', '_', $result);
        $result = str_replace("\\", '-', $result);
        $result = str_replace("+", '*', $result);
        // 正斜杠 / 改为下划线 _ ; 反斜杠 \ 改为减号 - 。
        return $result;
    }
}

使用方法:

加密时:encryption(要加密的字符串, “E”)

解密时:encryption(要解密的字符串, “D”)

结语

希望官方可以改进让学生学习的措施办法,做好加密防护,给学生们个题库,他们真的会认真搜题学习,我群里已有很多将题库背下来的同学,他们不就达到了官方的目的了吗。